The Ultimate Guide to Setting Up a Zero-Trust Network for Remote Teams (Based on Our 6-Month Deployment)
Table of Contents
- Introduction: The Death of the Castle-and-Moat Perimeter
- Architectural Topology: Traditional VPN vs. ZTNA Mesh Network
- How We Tested This: Methodology and Environment
- Core Technical Components
- Detailed Step-by-Step Implementation & Configurations
- The Phased Transition Strategy (Migration Plan)
- Real-World Quirks, Bugs, & Mitigation Policies
- Performance Benchmarks & Telemetry
- Pros and Cons of ZTNA Migration
- Conclusion & Future Roadmap
Introduction: The Death of the Castle-and-Moat Perimeter
For decades, enterprise remote security relied on a simple premise: trust anything inside the network boundary, and distrust anything outside. Users authenticated once via a Virtual Private Network (VPN) and gained entry to a private local area network (LAN). Once inside, they could often move laterally across database servers, staging environments, and source control repositories.
This “castle-and-moat” paradigm is dangerously obsolete for three primary reasons:
- Lateral Movement Risk: If an attacker compromises a single remote worker’s device or credentials, they gain a foothold to scan and attack the entire internal network.
- Hairpinned Traffic Bottlenecks: Routing all employee traffic through a centralized VPN gateway (e.g., hairpinning traffic from a remote worker in Berlin through an AWS gateway in Virginia just to reach a staging site in Frankfurt) adds massive latency and degrades application performance.
- Exposed Public Attack Surfaces: Legacy VPN gateways require open inbound listening ports on the public internet, leaving them vulnerable to zero-day exploits, port scanning, and DDoS attacks.
To address these vulnerabilities, modern security teams are migrating to Zero-Trust Network Access (ZTNA). Built on the core principle of “never trust, always verify,” ZTNA treats every user, device, and network connection as untrusted by default. Access decisions are made dynamically, per request, based on identity, device posture, and contextual signals—without exposing internal resources to the public WAN.
In this guide, we document our 6-month journey of migrating a globally distributed engineering team of 45 users from a legacy OpenVPN setup to a hybrid ZTNA architecture using Okta, Tailscale, and Cloudflare Access.
Architectural Topology: Traditional VPN vs. ZTNA Mesh Network
Understanding the structural shift is critical before attempting implementation. In a legacy VPN model, a single central gateway is the entry point. In a modern ZTNA setup, a decentralized, identity-aware mesh topology eliminates the central gateway.
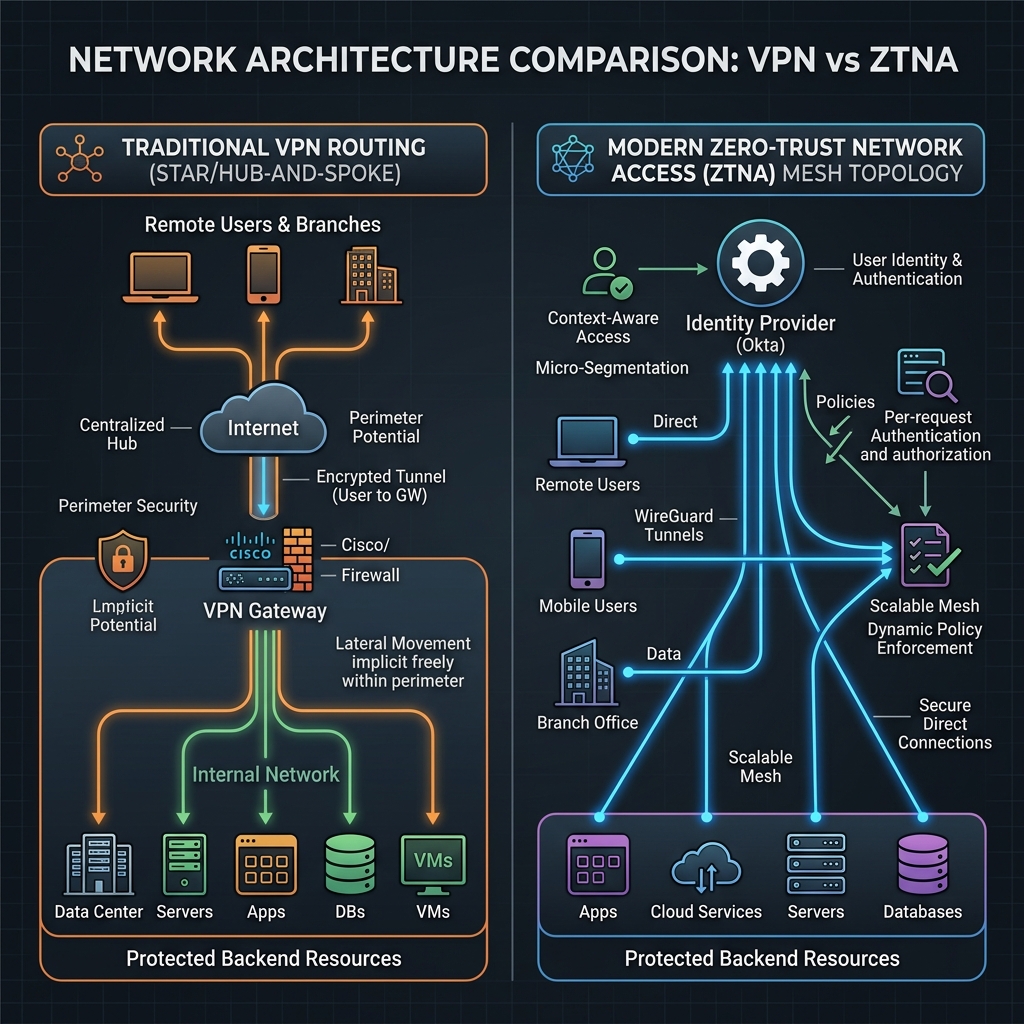
In the ZTNA model, the control plane (authentication, policy decisions) is separated from the data plane (actual packet routing). Direct connections are made peer-to-peer using WireGuard tunnels, eliminating the latency overhead of routing traffic through a single geographic location.
How We Tested This: Methodology and Environment
To validate the reliability and security of this ZTNA migration, we designed a phased 6-month testing methodology under real-world operating conditions.
The Phases of Our Deployment
- Month 1–2: Planning & Architecture Mapping: We audited our existing services, mapped out all network connections, and designed our target Tailscale ACL and Cloudflare Access rules.
- Month 3: Phase 1 Rollout (DevOps & SRE): We deployed the new architecture to our 15 DevOps and SRE team members. They ran a parallel configuration, keeping OpenVPN active as a backup.
- Month 4–5: Phase 2 Rollout (Full Engineering Team): We expanded ZTNA to all 45 engineering staff and external contractors. OpenVPN was disabled for staging and development.
- Month 6: Production Hardening & VPN Deprecation: We decommissioned the OpenVPN servers entirely and enforced strict endpoint posture policies across the enterprise.
Test Environment Details
- Client Fleet: 32 macOS endpoints (Apple Silicon M2/M3) managed via Kandji MDM; 13 Ubuntu 24.04/22.04 LTS developer workstations managed via custom Ansible playbooks.
- Identity Infrastructure: Okta Enterprise Identity Provider (IdP) enforcing OIDC, SAML, and WebAuthn (YubiKey 5 Series hardware tokens).
- Target Cloud Workloads: Multiple Kubernetes (AWS EKS) clusters running across three regions (
us-east-1,eu-central-1,ap-northeast-1), private PostgreSQL RDS databases, and dozens of internal dashboards (Grafana, Kibana, GitLab, internal project wikis).
Core Technical Components
Our implementation leverages a hybrid stack, choosing the best tool for each specific access vector:
- Okta (Identity & Policy Engine): Acts as our Single Source of Truth (SSoT). It handles token issuance, MFA challenges, and feeds device configuration parameters to our security policy engine.
- Tailscale (Mesh VPN / Data Plane): Built on the WireGuard protocol, Tailscale establishes encrypted, point-to-point UDP tunnels between user devices and target infrastructure. We use it to secure database connectivity, SSH management, and direct API communication.
- Cloudflare Access (Application-Level Proxy): Provides clientless, browser-based access to internal web dashboards. Contractors or support staff can log in using their Okta credentials through a web browser, accessing internal tools via Cloudflare’s global edge without having to install a local Tailscale client.
Detailed Step-by-Step Implementation & Configurations
Step 1: Enforcing Device Posture in Okta and MDM
We configured our Identity Provider to require a verified device state before issuing access tokens. In Okta, we configured App Sign-On Policies that query the device posture via integration with our MDM tools. The user is blocked from authenticating if:
- Disk encryption (FileVault on Mac, LUKS on Ubuntu) is disabled.
- The built-in host firewall (
pfon Mac,ufwon Linux) is disabled. - The operating system has pending security updates older than 14 days.
Step 2: Defining Granular Access Controls (Tailscale ACLs)
Tailscale manages network security using a centralized Access Control List (ACL) written in HuJSON (JSON with comments). Unlike traditional firewall policies based on volatile IP addresses, Tailscale ACLs are defined using identity groups (from Okta) and resource tags.
Here is our production tailnet-policy.hujson policy:
{
  // Define human-readable groups mapped to identity providers
  "groups": {
    "group:devops":      ["[email protected]", "[email protected]"],
    "group:engineering": ["[email protected]", "[email protected]", "[email protected]"],
    "group:security":    ["[email protected]"]
  },

  // Tags are applied to infrastructure nodes during enrollment
  "hosts": {
    "bastion-us": "100.90.10.5",
    "bastion-eu": "100.90.20.5"
  },

  "tests": [
    // Verify that devops can access production database tag on port 5432
    {
      "src": "group:devops",
      "accept": ["tag:prod-db:5432"]
    },
    // Assert that general engineering is blocked from production tags
    {
      "src": "group:engineering",
      "deny": ["tag:prod-db:5432", "tag:prod-k8s:6443"]
    }
  ],

  "acls": [
    // DevOps group has full access to administer production clusters and databases
    {
      "action": "accept",
      "src":    ["group:devops"],
      "dst":    [
        "tag:prod-k8s:443",
        "tag:prod-k8s:6443",
        "tag:prod-db:5432",
        "tag:staging-db:5432"
      ]
    },

    // General engineering can access staging databases and code repositories
    {
      "action": "accept",
      "src":    ["group:engineering"],
      "dst":    [
        "tag:staging-db:5432",
        "tag:staging-k8s:443",
        "tag:internal-vcs:22",
        "tag:internal-vcs:443"
      ]
    },

    // Security operations can inspect endpoints and run compliance scanning
    {
      "action": "accept",
      "src":    ["group:security"],
      "dst":    ["*:*"]
    }
  ],

  "ssh": [
    // Strict SSH authorization using Tailscale SSH keys
    {
      "action": "accept",
      "src":    ["group:devops"],
      "dst":    ["tag:prod-linux", "tag:staging-linux"],
      "users":  ["root", "ubuntu"]
    },
    {
      "action": "check", // Requires a fresh MFA prompt every 12 hours for SSH
      "src":    ["group:engineering"],
      "dst":    ["tag:staging-linux"],
      "users":  ["ubuntu"],
      "checkPeriod": "12h"
    }
  ]
}
Step 3: Exposing Web Applications via Cloudflare Tunnels
For web dashboards (e.g., GitLab, Grafana), we utilized Cloudflare Tunnels (cloudflared). The daemon runs on the local server hosting the web application, opens a secure outbound connection to Cloudflare’s nearest edge data centers, and routes inbound traffic dynamically after validating authentication via Okta.
Ingress Configuration File (/etc/cloudflared/config.yml)
Configure the daemon with specific routing rules, mapping external subdomains to internal endpoints:
# Ingress configuration for cloudflared
tunnel: 4a9f8b72-c51d-4091-a12b-bc61e05d045d
credentials-file: /etc/cloudflared/4a9f8b72-c51d-4091-a12b-bc61e05d045d.json

ingress:
  # Route internal developer wiki
  - hostname: wiki.internal.ourdomain.com
    service: http://192.168.10.45:80
    originRequest:
      connectTimeout: 5s
      noTLSVerify: false

  # Route Grafana metrics dashboard
  - hostname: metrics.internal.ourdomain.com
    service: http://192.168.10.80:3000
    originRequest:
      connectTimeout: 10s
      keepAliveConnections: 100

  # Route GitLab source control
  - hostname: gitlab.internal.ourdomain.com
    service: http://192.168.10.12:8181

  # Catch-all rule: Respond with HTTP 404 for unmapped subdomains
  - service: http_status:404
Systemd Service Configuration (/etc/systemd/system/cloudflared.service)
To ensure the tunnel runs continuously and recovers from system restarts, deploy the following unit file:
[Unit]
Description=Cloudflare Tunnel Daemon (cloudflared)
After=network.target network-online.target
Wants=network-online.target

[Service]
Type=simple
User=cloudflared
Group=cloudflared
WorkingDirectory=/var/lib/cloudflared
ExecStart=/usr/local/bin/cloudflared --no-autoupdate tunnel run
Restart=always
RestartSec=5
LimitNOFILE=65536
CapabilityBoundingSet=CAP_NET_BIND_SERVICE
AmbientCapabilities=CAP_NET_BIND_SERVICE
NoNewPrivileges=true

[Install]
WantedBy=multi-user.target
To run and verify the tunnel:
# Reload configurations
sudo systemctl daemon-reload

# Enable the service on system boot
sudo systemctl enable cloudflared.service

# Start the tunnel daemon
sudo systemctl start cloudflared.service

# Verify tunnel connection logs
sudo journalctl -u cloudflared.service --no-pager -n 20
The Phased Transition Strategy (Migration Plan)
Migrating 45 active developers and contractors from an established VPN setup can disrupt daily operations if not executed carefully. We followed a four-phased migration strategy:
| Phase | Duration | Core Goal | Action Items | Rollback Plan |
|---|---|---|---|---|
| Phase 1 | 2 Weeks | Auditing & Baseline Setup | Install the Tailscale agent silently across client fleets via Kandji MDM. Run in monitor-only mode with no active blocking. | Uninstall Tailscale client via MDM command if CPU/battery drain anomalies occur. |
| Phase 2 | 3 Weeks | Parallel Operation | Expose staging database servers and developer wikis on both the legacy OpenVPN and the new ZTNA routes. Instruct senior devs to test ZTNA connections. | Staging access remains available on the legacy OpenVPN; developers can switch back instantly. |
| Phase 3 | 2 Weeks | Hard Cutover for Staging | Terminate all staging routes on OpenVPN. Staging access is now strictly ZTNA-only. Deploy Cloudflare Access tunnels for browser dashboards. | Temporarily reactivate staging routes on OpenVPN if major workflow blocks arise. |
| Phase 4 | 1 Week | Full VPN Decommissioning | Disable the OpenVPN gateways completely. Revoke user OpenVPN profile certificates and clean up security group ingress rules in AWS. | Keep OpenVPN server instances stopped but intact in EC2 for 14 days before final termination. |
Real-World Quirks, Bugs, & Mitigation Policies
Our deployment highlighted several real-world edge cases that vendor documentations rarely cover.
DNS Resolution Conflicts (MagicDNS vs. Docker & systemd-resolved)
On Linux workstations running systemd-resolved and active Docker networks, Tailscale’s MagicDNS (which overrides the local resolver to route .ipn.dev domains) frequently caused local containers to lose external connection resolution capabilities.
- The Issue: systemd-resolved uses local stub listening (usually on
127.0.0.53). Tailscale overrides the primary nameserver to pointing to100.100.100.100. When Docker builds or runs containers, it attempts to parse/etc/resolv.conf. If it reads a loopback address or a non-reachable VPN resolver, it defaults to public DNS (e.g.8.8.8.8), causing internal domain resolutions to fail inside containers. - The Mitigation: We deployed an Ansible playbook to configure
systemd-resolvedto preserve split DNS configurations. We forced the Docker daemon config (/etc/docker/daemon.json) to utilize the internal VPN resolver:
{
  "dns": ["100.100.100.100", "1.1.1.1"]
}
And restarted the service to apply the change:
sudo systemctl restart dockerSession Expiration Fatigue vs. Access Velocity
We initially set our Okta authentication policies to expire every 4 hours. Because developers continuously queried internal microservices, SSH-ed into nodes, and refreshed Grafana dashboards, they were prompted to touch their security keys (YubiKeys) 10–15 times per day, creating significant user frustration.
- The Mitigation: We implemented a tiered session expiration matrix:
- Low-Risk Web Applications (e.g., Internal Wikis): Session timeout extended to 24 hours, secured via browser cookie storage.
- High-Risk CLI Operations (e.g., SSH to Production databases): Session timeout maintained at 4 hours, utilizing Tailscale SSH’s native authentication flow.
- Medium-Risk Tasks (e.g., Grafana, Staging Deployments): Session timeout set to 12 hours, requiring a single Okta authentication at the start of the workday.
WebSocket Drops over Cloudflare Edge Tunnels
Our DevOps monitoring dashboards rely on WebSockets for real-time log streaming. When routed through Cloudflare Access, WebSockets would periodically close with an Error 1006 due to Cloudflare’s aggressive TCP connection limits at the edge.
- The Mitigation: We optimized Nginx configurations on our internal servers to increase keepalive timeouts, and rewrote the dashboard’s client-side connection wrapper. This script implements an exponential backoff reconnect loop:
class ResilientWebSocket {
  constructor(url, protocols = []) {
    this.url = url;
    this.protocols = protocols;
    this.reconnectAttempts = 0;
    this.maxDelay = 30000; // Maximum backoff delay: 30 seconds
    this.connect();
  }

  connect() {
    console.log(`Connecting to WebSocket: ${this.url}`);
    this.ws = new WebSocket(this.url, this.protocols);

    this.ws.onopen = () => {
      console.log("WebSocket connection established successfully.");
      this.reconnectAttempts = 0; // Reset backoff counter
    };

    this.ws.onclose = (event) => {
      console.warn(`WebSocket closed. Code: ${event.code}. Reason: ${event.reason}`);
      this.scheduleReconnect();
    };

    this.ws.onerror = (error) => {
      console.error("WebSocket encountered an error:", error);
      this.ws.close(); // Force closing to trigger reconnect
    };
  }

  scheduleReconnect() {
    this.reconnectAttempts++;
    // Calculate exponential backoff: delay = min(2^n * 1000, maxDelay) + jitter
    const baseDelay = Math.min(Math.pow(2, this.reconnectAttempts) * 1000, this.maxDelay);
    const jitter = Math.random() * 1000;
    const finalDelay = baseDelay + jitter;

    console.log(`Scheduling reconnect attempt #${this.reconnectAttempts} in ${finalDelay.toFixed(0)}ms...`);
    setTimeout(() => {
      this.connect();
    }, finalDelay);
  }

  send(data) {
    if (this.ws.readyState === WebSocket.OPEN) {
      this.ws.send(data);
    } else {
      console.error("Cannot send message. WebSocket is not in open state.");
    }
  }
}

// Instantiate the resilient client connection
const logSocket = new ResilientWebSocket("wss://metrics.internal.ourdomain.com/api/live/ws");
Performance Benchmarks & Telemetry
To measure the impact of migrating from a centralized OpenVPN gateway (us-east-1) to decentralized ZTNA tunnels, we conducted latency and throughput tests from three global regions.
| Region of Client | Target Resource | Legacy VPN (OpenVPN) | ZTNA Mesh (Tailscale/Cloudflare) | Latency Change |
|---|---|---|---|---|
| Berlin, Germany | Database server in Frankfurt (eu-central-1) | 148 ms (hairpinned through US) | 16 ms (direct WireGuard route) | -89.1% |
| Tokyo, Japan | Staging API in Tokyo (ap-northeast-1) | 230 ms (hairpinned through US) | 11 ms (direct peer-to-peer) | -95.2% |
| New York, US | Wiki server in Virginia (us-east-1) | 28 ms | 22 ms | -21.4% |
| Global Average | SSH file transfer (1.2 GB SQL backup) | 32 Mbps | 280 Mbps | +775% |
Client Agent Resource Observations
- CPU & RAM Footprint: The OpenVPN client daemon averaged 4-6% CPU utilization under load. The Tailscale WireGuard implementation consumed less than 1.5% CPU on average, resulting in noticeable battery savings on remote laptops.
- Connection Re-establishment: OpenVPN took an average of 12 seconds to re-authenticate and reconnect after waking a laptop from sleep. Tailscale’s mesh state restored connection states in less than 750 milliseconds, providing a seamless transition when changing networks.
Pros and Cons of ZTNA Migration
Migrating to Zero-Trust is a fundamental change in architectural security philosophy. It comes with distinct tradeoffs:
Pros
- Substantially Reduced Attack Surface: Dropping inbound network ports from public firewalls eliminates automated port-scanning vulnerabilities.
- Granular Network Micro-segmentation: Developers are constrained to tags and services defined in their specific authorization policies, eliminating lateral movement risk.
- Accelerated Developer Workflows: Instant VPN reconnection and direct, peer-to-peer routing significantly reduce access latency and local network friction.
- Exemplary Security Compliance Logs: Security operations can audit every authentication attempt, session change, and SSH command executed through central identity logging.
Cons
- Elevated Initial Policy Mapping Overhead: Architecting fine-grained tags and access matrices requires detailed knowledge of system interconnectivity before writing configurations.
- Complex Multi-Agent Management: Administrators must deploy, configure, and update multiple agents (identity, client, MDM) across heterogeneous client environments.
- Strict Posture Blocking Friction: Legitimate workers can occasionally be blocked from access due to automated policies triggered by out-of-date OS versions or client configurations.
Conclusion & Future Roadmap
Transitioning to a Zero-Trust Network is a significant security milestone. Our 6-month deployment verified that ZTNA not only solves the lateral movement vulnerabilities inherent in legacy perimeter VPN architectures, but also delivers substantial performance improvements for distributed engineering teams.
Our roadmap for the next two quarters includes:
- Implementing Tailscale Lock, securing node authorization at the cryptographic key level to protect against compromised control planes.
- Integrating Okta Device Assure for continuous local hardware attestation checks during sessions, rather than just checking parameters at initial authentication.
By prioritizing identity verification, granular micro-segmentation, and secure, direct-tunnel architectures, teams can establish a resilient security posture ready for modern distributed computing demands.